Connecting an LCD indicator to the computer's LPT port |
RU |
At present, there is a huge amount of material on the net about connecting an LCD (LCD) to a computer via an LPT port. On the slider are the most common of them. There are also several programs for working with LCD: LCDMonitor2, LCDMonitor3, jaLCDs, Smartie5.1, 5.2. In my opinion, the most functional of the "bourgeois" programs is jaLCDs, because. it provides beautiful effects when changing screens, as well as monitoring many PC parameters when using the monitoring program Motherboard Monitor 5.3.3.0 (freeware). The combined use of jaLCDs and MBM 5 allows you to display on the LCD screen the temperature of the CPU, chipset, hard drive, the number of fan revolutions (if your coolers are equipped with speed sensors), the amount of used, physical, free memory, processor load, etc. With Winamp, you can generally do things like: display a spectrum analyzer, level indicator (stereo), bitrate, track duration, position in a playlist - this is far from an exhaustive list of the jaLCDs program's capabilities.
I connected the LCD 2 lines of 16 characters to the LPT port. I got an LCD type SC1602EULT-SH-GB-K on a KS0066 controller. When connecting, there were no problems (just need to solder 16 wires). The only BUT: backlight voltage = 4.2V. Everything is simple here: we connect 5V through a quenching resistor. Well, the supply voltage of the indicator itself is 4.8V - everything is elementary here too - we know that a conventional silicon diode of the KD522 type provides a voltage drop of the order of 0.2V, so KD522 once and everything is OK.
You can get 5 volts from various places: USB, PS / 2 ... I decided to make my LCD external, so I took 5V from the PS / 2 connector using the cord from the “killed” PS / 2 mouse.
I made the case from two top and one bottom cover from a CD box. We glue the two top covers from the CD with dichloroethane-based glue, cut off half the height with a dremel. Having drilled holes in the rear panel of the case for the cords (LPT cable and PS / 2 cable), we stretch them inward and solder them in accordance with the LCD pinout. We glue the ends with narrow strips cut from the same glass.
Connecting via the LPT serial port is a very simple task, but connecting via the USB interface requires “perverting”. That is, as a rule, this is achieved by using a microcontroller as an interface between a computer and your instrument.
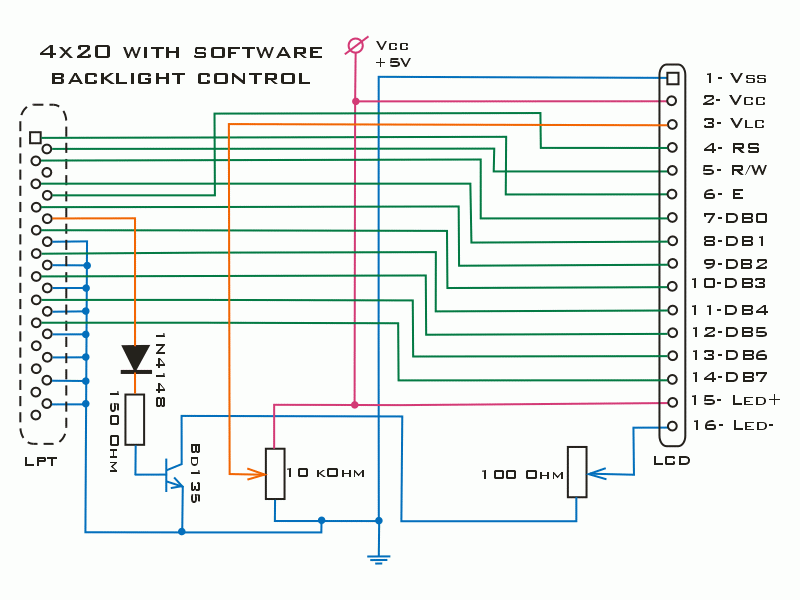
Now I have LCD 4x20. A much more informative indicator, besides, it allows you to use features such as VU-metter and Spectrum Analyzer using the jaLCDs program. Although I came across an LCD with an extended temperature range (negative voltage "-5v" relative to the common voltage must be applied to pin 3), it's still very cool - I applied the negative voltage from a lithium battery (these are in motherboards). If we take into account that the current consumption from a lithium battery is 3mA (MAXIMUM!!!), then it is clear that one battery will last, if not forever, then for a very long time. The lithium battery only lasted 5 days and died. The way out of this situation was found easily: I soldered the voltage inverter on the ICL7660 and everything works without problems. His diagram is in the top slider.
In the case of graphic indicators, a higher negative voltage is usually required at the contrast adjustment input. Using the DC/DC converter ICL-7661 will make it easy to solve this problem (see diagram in the top slider). It can also be useful to remember that if the product has an RS232 driver (for example, ST232), the necessary negative voltage (-10 ... -14V) can be borrowed from the converters built into these microcircuits.
For the LCD to work with this connection, a couple of files are needed: port95NT.exe. The prefix NT does not mean that it works only under W2K (works under all "Windows"). According to some information (I read it on some forum), these drivers under Windows XP are unstable. Although I installed and used them under Windows XP and there were no glitches for two weeks. I will not give the address on the network for downloading drivers (sometimes there are "broken" links) - just type port95NT.exe in any search engine and you will get a couple of dozen links.


